
Desert Online General Trading LLC
Dubai, United Arab Emirates
Desert Online General Trading LLC
Dubai, United Arab Emirates


🚀 Capture, Connect, Create — The Ultimate IoT Camera Module for Visionary Makers
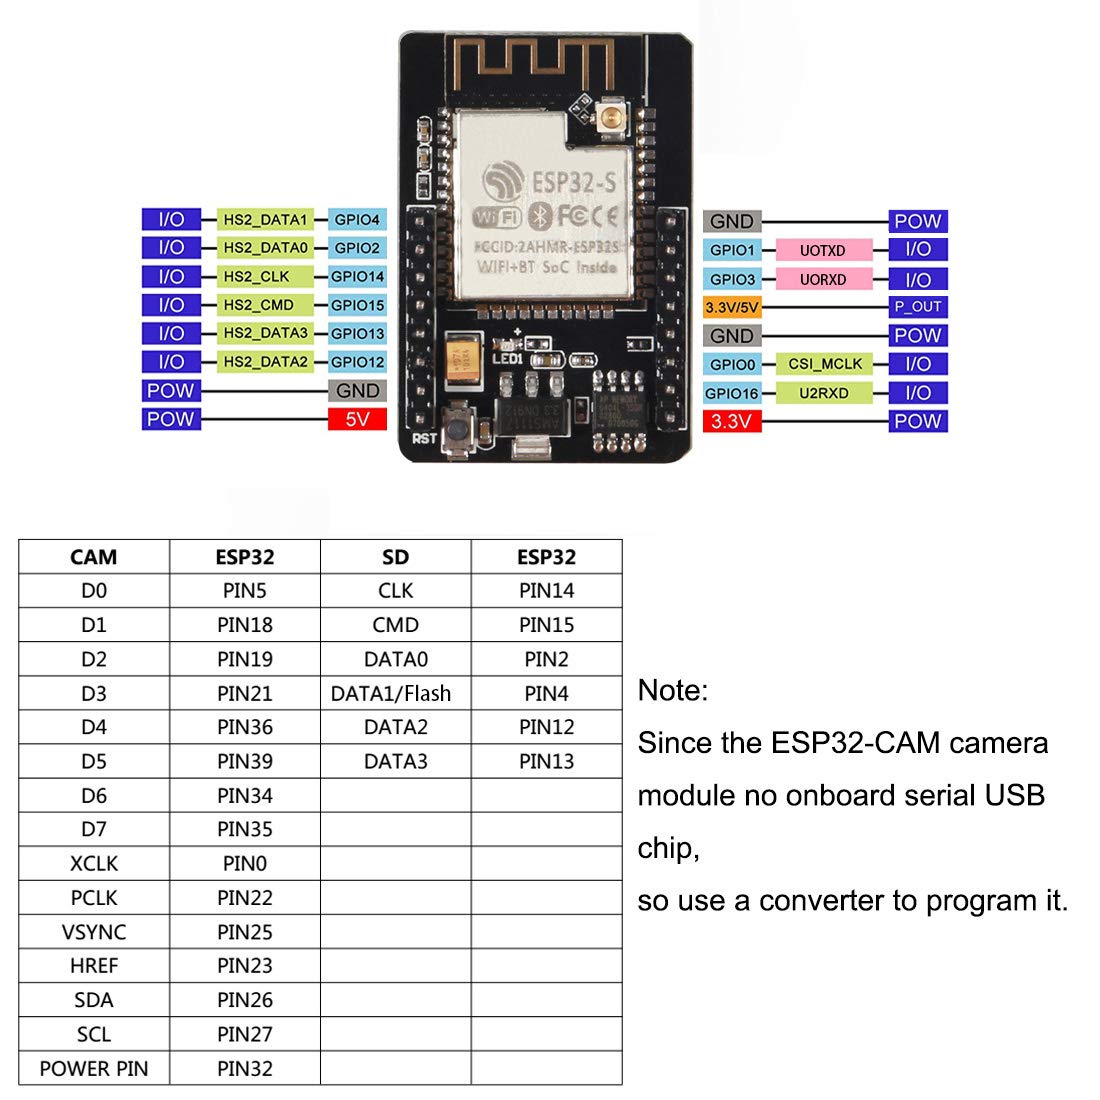
The Aokin ESP32-CAM is a compact, dual-core 240MHz development board featuring a 2MP OV2640 camera with built-in flash, integrated WiFi and Bluetooth 4.2, and multiple sensor interfaces. Designed for seamless IoT integration, it supports extensive connectivity options and storage, making it ideal for smart home, industrial control, and wireless monitoring applications.
P**E
Great little units, be sure to read the note and let GPIO0 float!
These work great, I'd recommend them to anyone looking for an ESP-CAM. The pin configuration is the same as CAMERA_MODEL_AI_THINKER if you are using the CamWebServer demo. Note, however that the LED_GPIO_NUM listed in camera_pins.h (GPIO33) is actually the red LED on this board, NOT the white "flash" LED. Change it to GPIO4 to use the flash.I wasted a ton of time on these as the camera stopped working the first time I re-flashed them. It turns out that after I held GPIO0 low to enter programming mode, I then pulled it high to run the unit. After way too much time confirming all the pins were configured correctly, I broke down and picked up the sheet that came in the package and read it. It clearly says that GPIO0 is feeding XCLK on the camera and to leave it floating during operation. Completely my stupid fault and I don't fault these units for it at all.One thing to note, if you are planning to work with near-infrared light, the cameras that came with my units have the IR cut filter at the top of the lens stack. I see no way to remove this filter without destroying the lens body completely. Reading around, it seems like many of thiss style of OV2640 you can buy now are so afflicted, so I don't think that buying an ESP-CAM from a different seller is a guaranteed way to avoid this. I found two workable options:1. Other OV2640 cameras on Amazon like this one: https://www.amazon.com/dp/B09XXPX4SP?psc=1&ref=ppx_yo2ov_dt_b_product_details have a cut filter you can remove, you can just swap that in and it works great.2. You can unscrew the lens on the camera that comes with these ESP-CAM units and then put a larger M12 lens on top of it. Either just buy one that has no IR cut filter (Amazon does not seem to sell these but you can find them using the Google), or buy one on Amazon like this guy: https://www.amazon.com/dp/B08GQNMNDW?psc=1&ref=ppx_yo2ov_dt_b_product_details and remove the filter. My review of that unit has some pics of what this can look like. Switching to an M12 lens opens a ton of other options too, as M12 seems to be the most common size for this kind of application.
A**R
For $8, wow!
Great little embedded computer for the price. Set it up quite easily using Arduino IDE and the CameraWebServer ESP32 sample. Picture quality was amazing for such a cheap device, though (as the paper that comes with it pointed out) you have to give it a strong 5V supply to avoid brownouts. It has a 3.3V option, but the camera doesn't work as well with it. I programmed it through my Uno Mega board's FDTI chip, but I did have to modify the boards.txt to turn down the baud rate to 115200 to avoid comm errors. Not sure if it was the ESP32-CAM's fault or loose wiring from the UNO. After testing, I hooked it up to the serial port on my roomba (with a 5V regulator since the Roomba's DIN provides unregulated 12V), loaded a simpler webcam example and modified it to add a telnet server to pass Roomba OI commands to serial, wrote a quick driving app in C# on my desktop. Took about 6 hours of hacking, but I now have a tele-operated Roomba with built in camera. Cool. :)
M**S
I have not been able to recieve any signs of life from this camera.
I am new with arduino and this is my first cam, but I have tried many times with different examples and so forth to get even a response in serial monitor but no luck yet. If I get it working Ill fix my review.This item is marked as "often returned" so I wonder if some are just defective or what.
H**H
Difficult to Program but It's Okay for What You Pay For It
The most difficult part of this device is the programming. I wish those that sell these parts get the pinout right, but there is an error in the diagram. The sheet that comes with it shows the pin on the upper right, orient with the esp32 up and the reset pin on the lower left, as GND. It is not, it's actually the EN pin. To program this one has to gnd the GPIO0 and toggle EN from high to low. The GPIO0 can then float. I found the easiest way is to keeping EN gnd, gnd GPIO0 and power cycle the device.I would be so easy to put a programming circuit in so Arduino IDE and VSCode could program it with no effort.The camera needs to have GPIO0 float for it to work after programming. A pain, isn't it?
S**X
Perfomant
Tested with Arduino and Micropython, no issues. Work great.
T**E
They ACTUALLY HAVE 4M!
After spending a ton of money with other ESP33CAM boards with other sellers that claim to have 4M of memory on board, I finally found one that actually has the 4M memory chip.This module works great for doing AI on the edge utility meter readings and sending them to HomeAssistant.
S**1
Works with AI on the edge!
Works great for AI on the edge to read my water meter. Easy to program using a YP-05 and some jumper wires.
J**D
Adequate for basic camera functions, not much more
Got this to work with the ESP32 Web Server, like other reviewers, but the interface kept crashing until I turned the jpeg quality low enough for it to be stable. The documentation for this is fairly poor; it would be helpful to have the specs from this listing repeated on the page that comes with the boards, but other than calling out a couple of exceptions it mostlly repeats the AI Thinker images and text and links out to Random Nerd Tutorials. Unless you just want to have a remote camera in a box -- like something to remotely monitor your 3D printer -- you're probably going to save yourself time and frustration spending a few more dollars on a better-supported board.
Trustpilot
2 weeks ago
3 weeks ago
4 days ago
1 week ago